|
Smith Brothers Services, LLC |
 |
||||
| PLOW PARTS |
|
TRUCK PARTS |
|
PLOW REPAIRS |
||
|
|
Smith Brothers Services, LLC |
|
||||
| PLOW PARTS |
|
TRUCK PARTS |
|
PLOW REPAIRS |
||
Rebuilding a Meyer E-47 Pump - Step by Step
Page - 3

(Note: The Fluid Tank has not been removed yet.) Now you can see how much gunk is in this unit. You can see the milky blue fluid. You can see the plastic Baffle that is held in by the tooth washers on two of the studs. You can see the pump Suction Screen. You can see the Drain Plug, and how simply draining the pump did not remove any of the gunk.
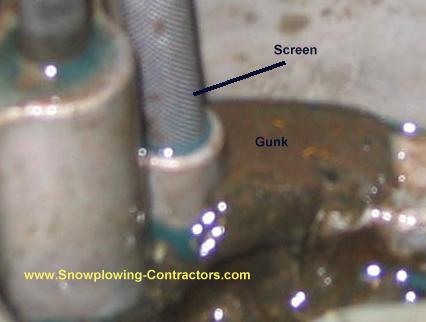
The good thing is that the pump Suction Screen is very tall, and has a lot of surface area. While this pump was loaded with gunk, it is not enough to plug the Suction Screen.

Another view where you can see the Drain Plug better.

Most of the gunk has been removed with Non-Chlorinated Solvent. You can see the O Ring that seals the base of the Lift Cylinder. The Suction Strainer has been removed. You can see how deep the Sump Base is too.

Next we remove the nut that holds in the Pilot Check Piston using a 13/16" wrench. We then remove the Pilot Check Piston using a magnet.

Using a 1/2" wrench we remove the nuts holding the pump onto the Sump Base. The hole on the right is the Pump Check Valve. Be careful as it might pop out when removing the pump.
You can find all the parts you need to rebuild it yourself at SmithBrothersPlowParts.com (Our Online Store)
SKU: E-47-DVD
|
|
Meyer E-47 Pump Rebuild - Page - |
|||||||||||
| 1 | 2 | 3 | 4 | 5 | 6 | 7 | 8 | 9 | 10 | ||
Smith Brothers Services - Home Page
~Site Navigation~
|
|
Smith Brothers Services, LLC |
 |
| |
Entire site Copyright 2012 Smith Brothers Services, LLC All Rights Reserved
Our Other Sites:
Snowplowing-Contractors.com
SmithBrothersTruckParts.com
ChucksChevyTruckPages.com
SmithBrothersPlowParts.com
MeyerST.com
LetsTalkSnow.com MeyerPlows.info
PlowPump.info
DiamondPChopper.com
MeyerPlowPumpParts.com
Home-Plow-By-Meyer.com
MeyerE-57.com
MeyerE-60.com
MeyerE-58H.com
MeyerDrivePro.com
MeyerLotPro.com
MeyerE-47.com
MeyerRoadPro.com
MyWillys.com
MeyerPathPro.com
MeyerVPlow.com
MeyerE-72.com Smith
Brothers Services on
YouTube
Author: Chuck Smith